Author Archives: jay

How to register a domain name?

With the growing number of websites on the Internet, it is becoming harder and harder to find a suitable domain name to register – one that is short, simple, to the point, and easy to remember.

That’s why, if you come across such a domain name that is suitable for your business or personal website, it is recommended that you register it right away.

Even if your website is not ready yet. You can register unlimited domain names through your account with us and there is no need to host them all. To find more information on hosting a domain name, please refer to the article: How do I host a domain name?

You can easily register a domain name via the Registered Domains section (My Domains > Registered Domains) of the Web Hosting Control Panel. Once you open that menu you should click on the Register/Transfer Domain button on the right-hand side.


Domain Manager - Register Domain

To find our Domain Search form, click on the Domain Search button on the left sidebar of the page. This form will help you find an available domain name for you to register. In the section that is titled Search for a domain: you should input the domain name that you would like to register (what you enter will replace the predefined text my-best-domain.com).

Below that you have a list of all domain types (TLDs) that we can register and you have the option to select and deselect any of them. That way you will be able to choose what domain TLDs to search for.


Domain Search Form

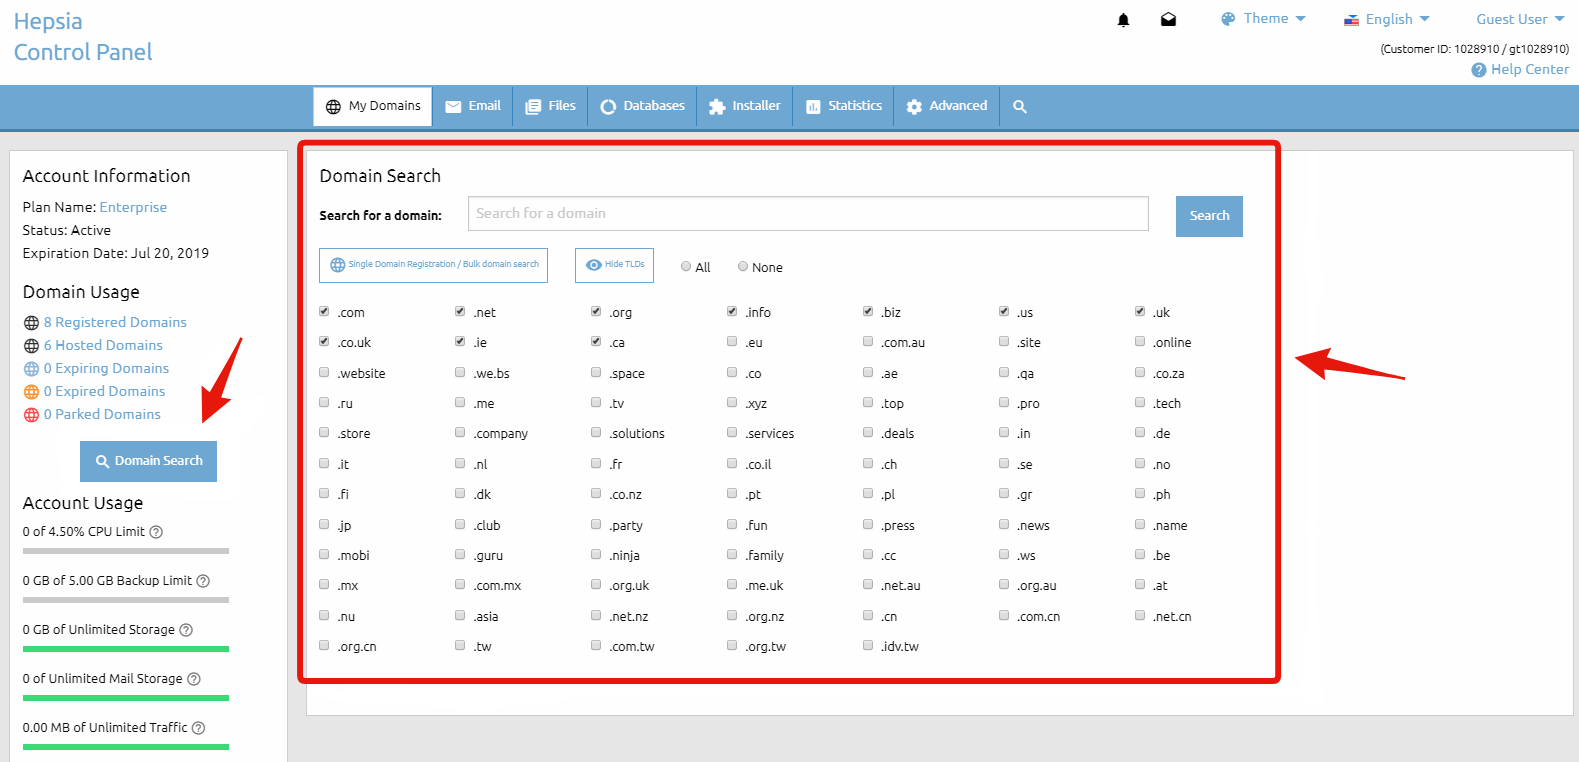
After that you must click on the Search button. That will execute a search based on the parameters that you have provided and you will be forwarded to the next page Domain Search Results to see the results.

If a domain name is available for registration you will see a Register button next to it. If you are trying to register a domain name, yet only a Transfer option appears, this simply means that someone else already owns the domain name and it is not available for registration.

If you own this domain name you can transfer it to our company by selecting the Transfer button. For more information on transferring a domain name, please refer to the What is a domain transfer? article. If you find the desire domain(s) you have to click on the Proceed with the order button.

On the next page, you also have the option to make a new search if the results from the initial one are not satisfactory. You can keep modifying the search parameters until you find a domain name that you wish to purchase.

There you will find a checkbox named Host this domain name with us. This gives you the option to immediately host the domain name after you submit the payment for the registration. If your current hosting plan does not allow hosting more domain names, you will be provided with the options to purchase an additional hosted domains upgrade or upgrade to a higher package, if one is available.

As soon as you find the domain name that you are looking for and you are ready to proceed with the registration, you must click on the Register button. That will take you to the next step – the contact information for the WHOIS record. Please make sure that you provide accurate contact details. This information will be publicly available.

For some domain TLDs you can purchase an additional service – WHOIS protection (also called ID protection) – that will conceal and protect your contact information. For detailed information about that service, please refer to the What is WHOIS ID protection? article. Once you fill out the registrant section, and if you wish to use the same contact information for all the other sections, there is an option to copy the same information in the other sections as well.

Before proceeding any further, you must agree with the Domain Registration Terms, the Domain Resolution Policy & the eNom Registration Agreement. It is recommended that you familiarize yourself with these documents.

And last, but not least, you need to choose the payment method you would like to use and then click the Continue button on the right to proceed to the payment page, where you will enter your payment information. If none of the listed payment options is suitable for you, please refer to the How to Pay Without a Credit/Debit Card or PayPal article.

How to Pay Without a Credit/Debit Card or PayPal

We understand that not everyone has access to a credit/debit card or PayPal. That’s why we provide multiple alternative payment options, making it easy for you to pay for hosting plans, domain renewals, and other services—without any hassle.

WebHost4Life Alternative Payment Options

1. Skrill (Formerly Moneybookers)
If you have a Skrill account, you can transfer funds directly to support@duoservers.com. Be sure to include a note specifying what the payment is for, such as your hosting plan, domain renewal, or invoice number.
While Skrill accounts are often funded via credit or debit cards, in many regions you can also add funds through local banks—even if you don’t have a bank account.

2. Bank Wire Transfer
Bank wire payments are another secure option. When you choose this method during checkout or renewal, you’ll receive our bank account details and a short form to complete, including:

  • Sender’s full name
  • Transaction or reference number
  • Exact payment amount

You can also submit this information through a support ticket. Just make sure to clearly indicate the purpose of the payment for smooth processing.

Why Choose WebHost4Life?

With high-performance servers, 24/7 expert support, and a 99.9% uptime guarantee, WebHost4Life ensures your websites remain fast, secure, and always accessible. Whether you’re running a small personal blog, an online store, or multiple business websites, we provide reliable hosting, advanced tools, and scalable resources to help your projects grow. With WebHost4Life, you can focus on your website while we take care of the technology behind it.

Understanding Recurring Payments and Automatic Renewals at WebHost4Life

Introduction

At WebHost4Life, reliability and convenience are core to our hosting services. To ensure uninterrupted access to your websites, domains, and hosting plans, we use an automated recurring billing system. This system helps prevent missed renewals, reduces the risk of downtime, and allows you to manage your services with confidence. Below, we explain how recurring payments work, when charges are processed, and how you can manage or update your subscription settings.

How Recurring Payments Work

When payment for our services (including hosting plans, domain registrations, and upgrades) is made using a credit or debit card, or via PayPal, a recurring payment subscription is automatically established for the subsequent billing cycle.

This subscription enables automatic renewal of the applicable service, ensuring uninterrupted access to your WebHost4Life hosting environment and eliminating the need for manual renewals.

Recurring subscriptions are created automatically at the time of payment. For card payments, subscription details are included in the payment confirmation email. For PayPal transactions, confirmation is provided directly by PayPal via a separate notification.

Advance Renewal Processing

Recurring charges are processed seven (7) days prior to the subscription’s renewal date. This advance processing is designed to minimize the risk of service interruption in the event of payment issues, such as insufficient funds in a PayPal account.

If a renewal attempt fails, the account holder will be notified promptly and provided with a seven-day period to take corrective action, ensuring sufficient time to resolve the issue and maintain continuous service.

Managing or Canceling Subscriptions

Active subscriptions may be viewed or canceled at any time through the WebHost4Life Control Panel. To access this option, hover over your account name in the top-right corner and navigate to the Recurring section.

PayPal subscriptions may also be managed and canceled directly through your PayPal account.

Changing Your Payment Method

If you wish to keep an active subscription while updating the associated payment method, go to the Recurring section and select Change. A dialog window will allow you to choose from PayPal, FirstData (credit and debit cards), or WorldPay (American Express).

After selecting a new payment method, you will be redirected to a payment authorization page to complete a $0.00 transaction. This authorization enables future automatic charges when your hosting plan or domain is due for renewal.

Conclusion

WebHost4Life’s recurring payment system is designed to provide a seamless, secure, and worry-free billing experience. By automating renewals and offering flexible subscription management options, we help ensure your websites and domains remain active without interruption. Should you need assistance at any time, our support team is always available to help you manage your services and continue enjoying the performance, stability, and dependability that WebHost4Life hosting delivers.