Category Archives: Database

How to Access and Edit Your MySQL Database Online with phpMyAdmin

Managing your MySQL databases is simple and efficient with WebHost4Life. Using phpMyAdmin, you can access, edit, and maintain your database directly through a web browser.

1. Accessing Your Database

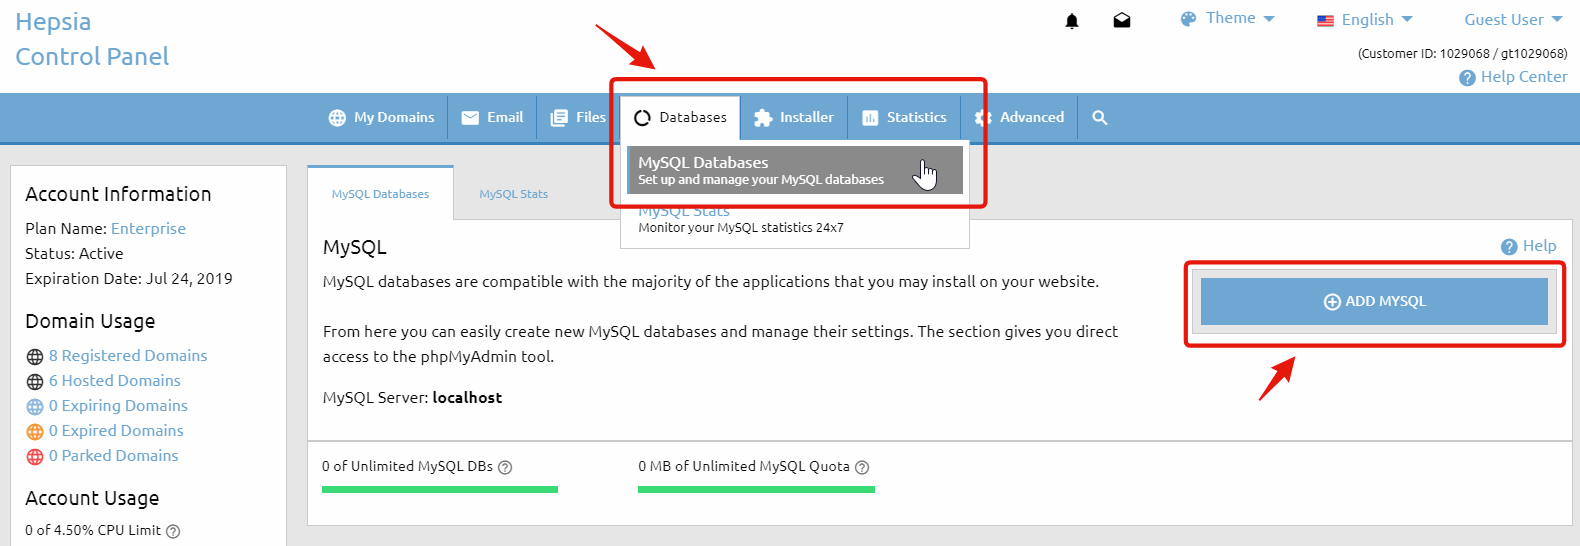
  • Log in to your WebHost4Life Control Panel.
  • Navigate to Databases > MySQL Databases.
  • Click on the name of the database you want to access.

A new window will open displaying the phpMyAdmin home screen.

2. Understanding phpMyAdmin

phpMyAdmin is a web-based application that allows you to manage every aspect of your database, including:

  • Creating tables, columns, and rows manually
  • Editing existing data
  • Importing and exporting data
  • Running SQL queries

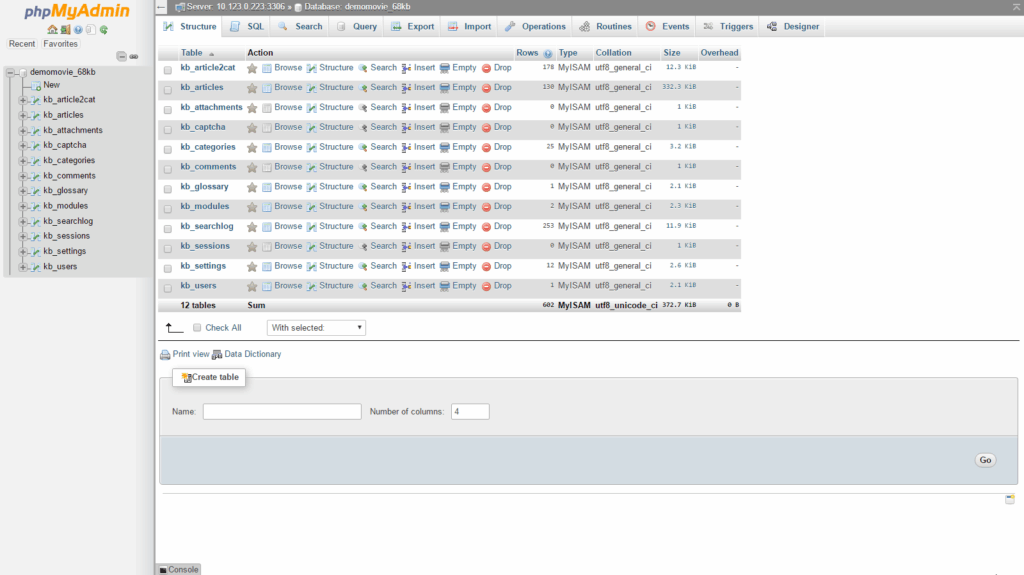
3. Viewing Database Tables

  • Your database tables are listed in both the main panel and the left sidebar.
  • If tables do not appear immediately, select your database from the drop-down menu in the left panel.
  • To open a table, click its name in the left sidebar.

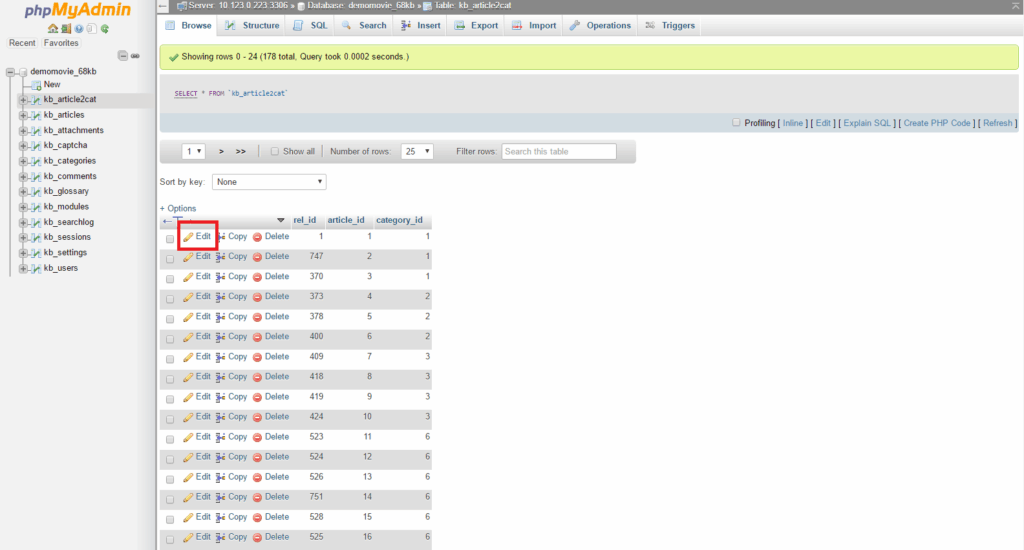
4. Editing Table Data

  • After opening a table, you will see its columns and rows containing data.
  • To edit a row, click the pencil-shaped icon next to it.
  • A form will appear where you can modify the data for the selected row.
  • Make your changes and click the Go button to save them.

Note: Each column has a specific data type, which must be followed when editing.

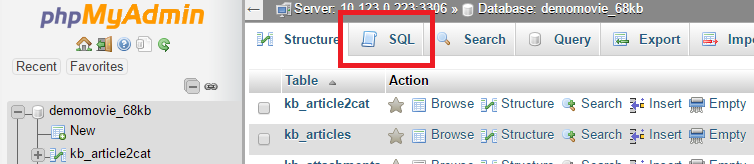
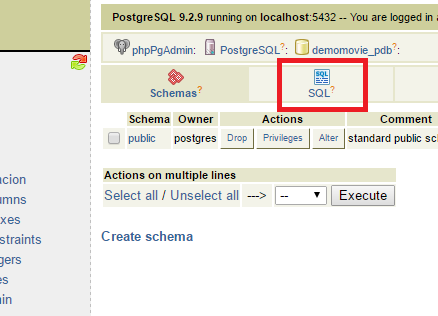
5. Executing SQL Queries

  • Click the SQL tab at the top of phpMyAdmin.
  • Enter your query in the Run SQL query/queries field.
  • Click the Go button to execute the query.

6. Importing and Exporting Databases

phpMyAdmin also allows you to create backups and restore databases:

With WebHost4Life hosting, managing your MySQL databases is fast, secure, and fully browser-based, giving you complete control over your website’s data anytime, anywhere.

How to Restore (Import) Your MySQL Database from a Backup

You can easily manage and restore your MySQL databases online using the phpMyAdmin tool, which is fully integrated into your WebHost4Life Control Panel. This tool allows you to access, export, and import databases quickly and securely.

To access phpMyAdmin:

  1. Go to Databases > MySQL Databases in your Control Panel.
  2. Locate your database in the list and click on the phpMyAdmin icon next to it.

A new window will open with the phpMyAdmin home screen. In the left-hand frame, click on your database name to select it.

In the top-right frame, you will see several icons. Click on the SQL icon (the second one) to open the query window.

To import your database backup (dump file):

  1. Click on the Import Files tab in the query window.
  2. Press the Choose… button and select the backup file from your local computer.
  3. Click Go to start importing the database.

Important: Using this method, you can import dump files up to 20MB in size. For larger files:

  1. Upload the file to your WebHost4Life hosting account via FTP (see our guide: How to Connect via FTP and Upload or Download Files on WebHost4Life).
  2. Submit a support ticket in your WebHost4Life Control Panel, and our technicians will assist you with importing the file.

With WebHost4Life hosting, restoring MySQL databases is simple, secure, and reliable. Our hosting services provide full MySQL support, high-performance servers, and expert technical assistance to ensure your website and applications run smoothly. Try WebHost4Life cloud hosting today and experience hassle-free database management for your site!

How to Backup (Export) Your MySQL Database with WebHost4Life

You can easily manage your MySQL databases online using the phpMyAdmin tool, which is fully integrated into your WebHost4Life Control Panel. This tool allows you to access, export, and import databases quickly and securely.

To access phpMyAdmin:

  1. Go to Databases > MySQL Databases in your Control Panel.
  2. Locate your database in the list and click on its name.

A new window will open with the phpMyAdmin home screen. In the left-hand frame, you will see your database—click on its name to view its contents.

The right-hand frame will display a list of all the tables in your database, along with actions and preferences you can perform.

To back up (export) your database:

  1. Click on the Export link above the table list.
  2. Scroll down and select the Save as file option.
  3. Click Go to start the download.

You will be prompted to choose a location on your local computer to save the backup.

The exported file can later be used to restore your database through phpMyAdmin, ensuring that your data is always safe and easily recoverable.

With WebHost4Life hosting, managing MySQL databases is simple, secure, and reliable. Try WebHost4Life hosting today and enjoy full MySQL support, high performance, and top-notch customer service for your website!

What Is a MySQL Database and How to Create It

MySQL is one of the most popular systems for storing and managing data. It organizes information in a structured way, allowing websites and applications to work efficiently.

Most web applications – like WordPress, Joomla, Drupal, or osCommerce – rely on MySQL databases to store content, settings, and user data. If your website or app needs a database (especially PHP-based applications), it will likely require MySQL.

A MySQL database stores data in tables made of columns and rows. When your website needs specific information, it sends a query to the database to retrieve it.

WebHost4Life hosting fully supports MySQL databases, making it simple to create, manage, and use databases for your website or web application. With WebHost4Life, you get reliable database performance and full control via your hosting Control Panel.

To create a MySQL database in your WebHost4Life account:

  1. Go to Databases > MySQL Databases in your Control Panel.
  2. Click the Add MySQL tab on the right-hand side.

Typically, a separate database is created for each web application you install. This makes it easier to manage your applications individually.

In the MySQL Databases section of your Control Panel, you can view a list of all the MySQL databases you have.

On our servers, the database name and username are the same. For example, if your database is named account_database, the username will also be account_database.

Each database can only have one user, which is created by default. New users cannot be added. The default user has full privileges for that database.

When configuring a script or application to use one of your databases, you will need the following:

  • Database name
  • Database username (same as database name)
  • Password
  • MySQL host/server

You can find the MySQL host listed in the table of your existing databases—it is usually localhost.

With your database ready, your website or application can start storing and retrieving data quickly and securely. Get started today with WebHost4Life hosting and enjoy full MySQL database support for your website!