Category Archives: Domain & DNS

How to Register Name Servers for a Domain Name at WebHost4Life

Name Servers are essential for pointing your domain to the correct hosting server. If you want to use custom or private name servers for your domain registered with WebHost4Life, you can easily set them up via the Control Panel. There are two ways to register a new Name Server (NS) record for a domain registered with WebHost4Life:

Option 1: Using the Edit Name Servers/WHOIS Column

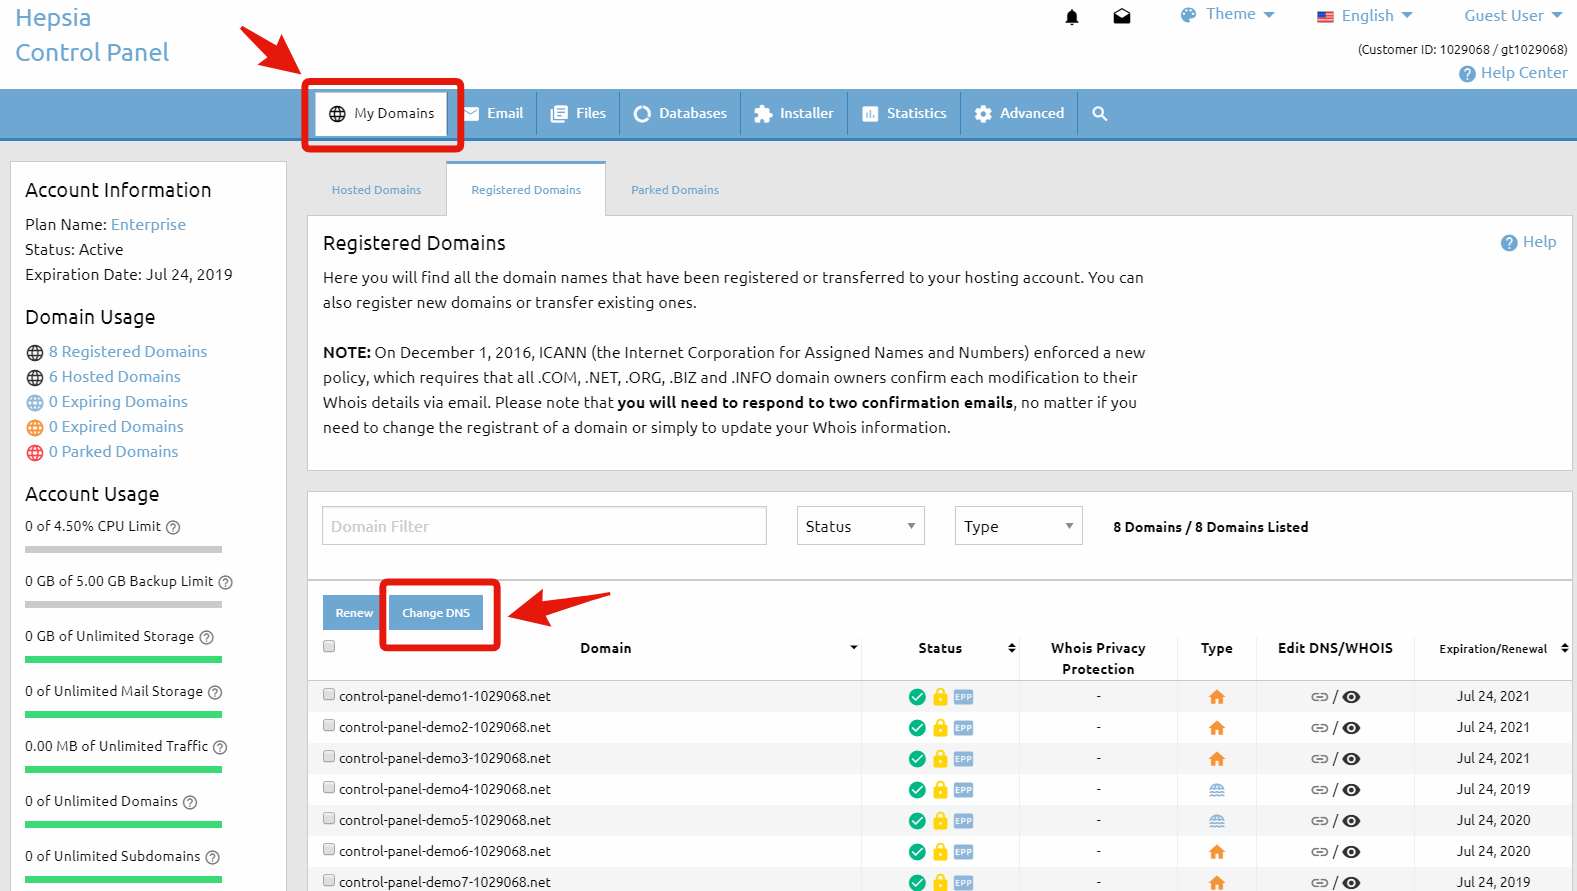
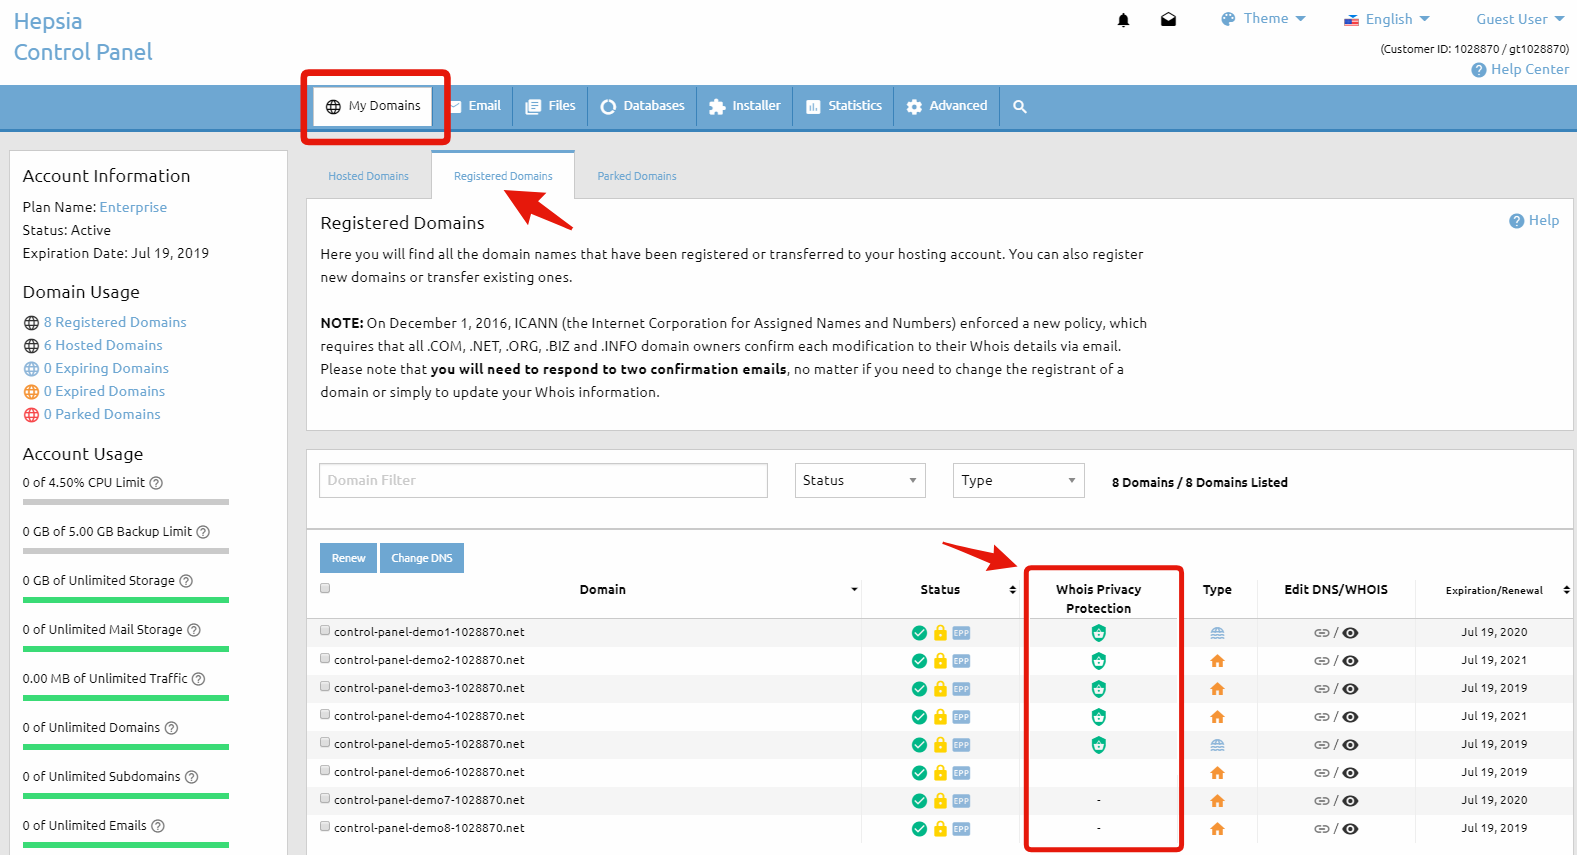
  1. In your WebHost4Life Control Panel, go to My Domains > Registered Domains.
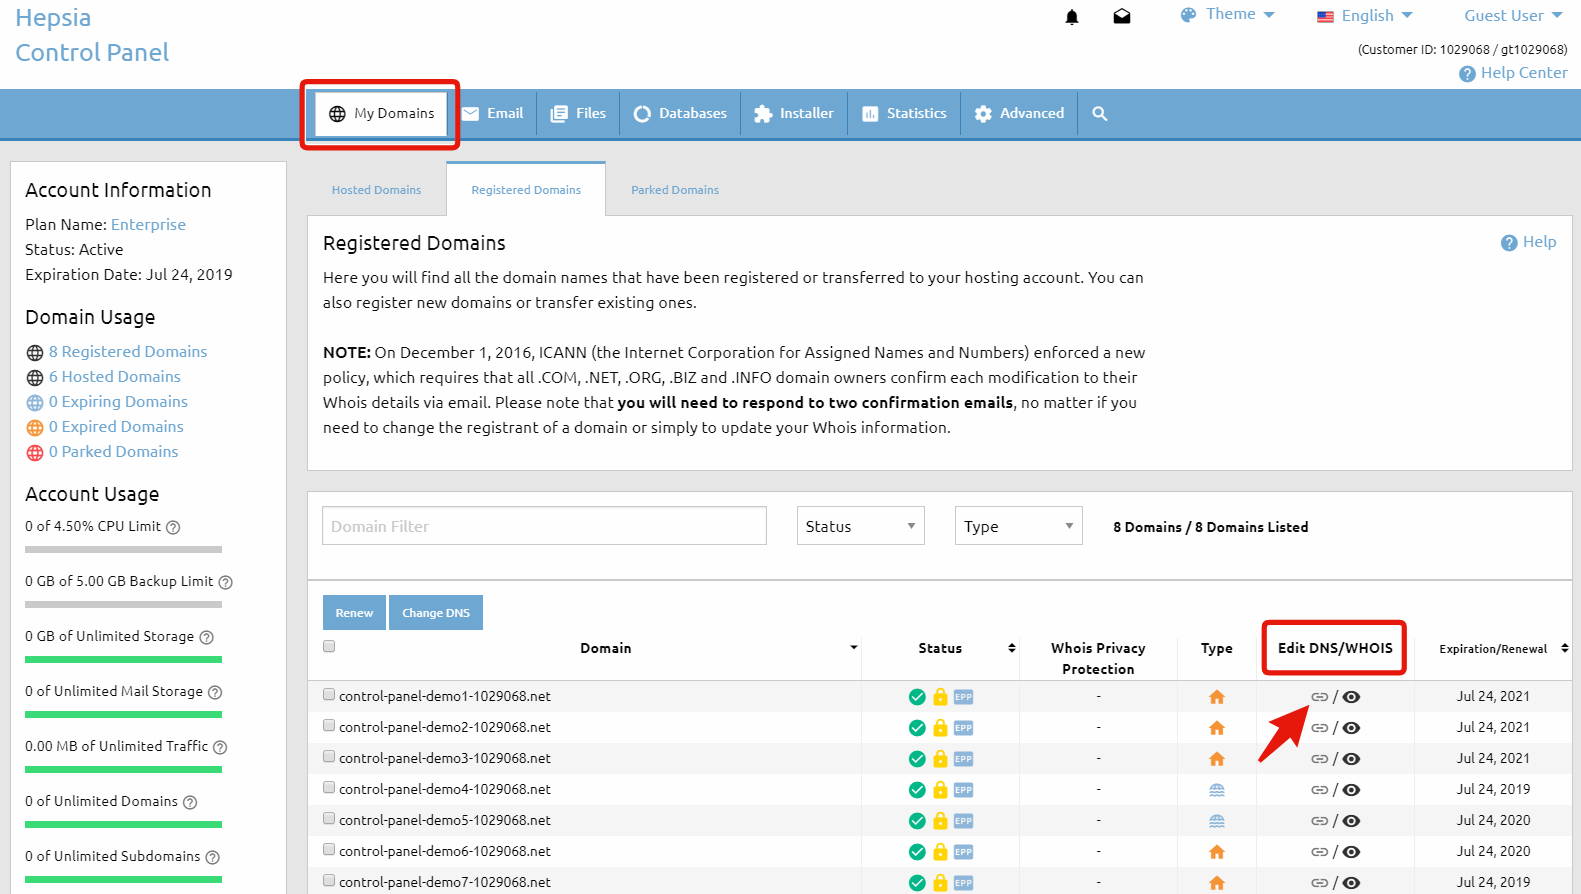
  2. Locate the domain you want to update and find the Edit Name Servers/WHOIS column. Click on the Edit Name Servers icon.
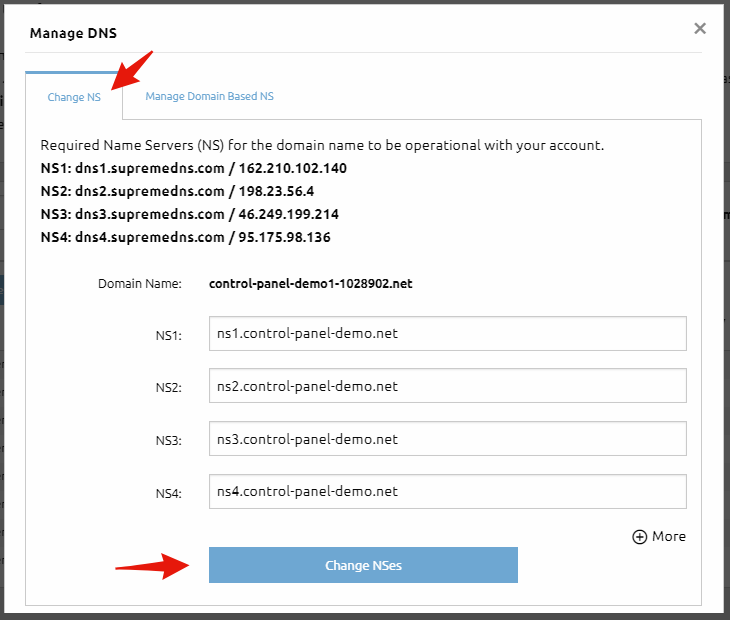
  3. The Manage DNS pop-up window will appear. Switch to the second tab: Manage Domain-Based NS.
  4. Fill in the NS and IP fields for the new name server.
  5. Click the Register button to save your new NS record.

Option 2: Using the Domain Information Window

  1. Log in to your WebHost4Life Control Panel, go to My Domains > Registered Domains.
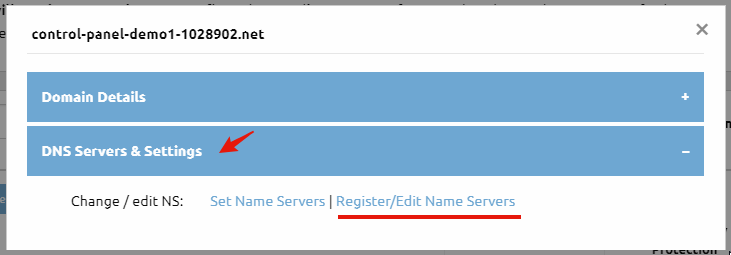
  2. In the Domain column, click on the domain name you want to update.
  3. The Domain Information pop-up window will open. Navigate to the second tab: DNS Servers & Settings, and click the Register/Edit Name Servers link.
  4. In the Manage Domain-Based NS tab of the Manage DNS pop-up, fill in the NS and IP fields.
  5. Click the Register button to add your new NS record.

Important Notes

  • Changes to name servers may take up to 24 hours to fully propagate across the internet.
  • You can register multiple NS records for redundancy and better performance.
  • Using WebHost4Life for both domain registration and hosting makes managing your DNS quick and easy.

How to Change the Name Servers of a Domain Name at WebHost4Life

To change the name servers of a domain name, you need to contact the registrar company where the domain is currently registered.

If your domain name is registered with WebHost4Life, you can easily update the name servers through the Domain Manager section of your WebHost4Life Control Panel (My Domains > Registered Domains). There are three ways to do this:

Option 1: Change Name Servers in Bulk

In front of each domain name, there is a checkbox that allows you to select it. Once selected, click the Change DNS button.


Edit name servers

After you click the Change DNS button, you will be redirected to a page where you can enter the new name servers. When you’re done, click the Change NSes button to save the changes.

Important: You can use this option to update the name servers for multiple domain names at once.

Option 2: Edit via the DNS/WHOIS Column

Next to each domain name, there is a row of icons divided into separate columns. Locate the column named Edit DNS/WHOIS and click the NS Status icon(the one the arrow points to in the image below).


Edit name servers

After you click the NS Status icon, a small pop-up window will appear with two options:

  • Edit the name server settings
  • Register your own private name servers

If you choose the first option, you’ll be redirected to the same page as in Option 1, where you can enter the new name servers.

When finished, click the Change NSes button to save your changes.

To learn more about the second option, please refer to the article: How to Register Name Servers for a Domain Name.

Option 3: Edit from the Domain Information Window

In the Domain column, click the domain name you want to edit.

This will open the Domain Information pop-up window with details for the selected domain name. Locate the DNS Servers & Settings tab and click the Register/Edit Name Servers link.

Edit NS

In the Change NS tab of the Manage DNS pop-up window, enter your new name server settings and click the Change NSes button.

Edit NS settings

Important: Name server changes may take up to 24 hours to fully propagate across the internet.

Why Choose WebHost4Life for Domains and Hosting?

With WebHost4Life, you don’t just get a domain – you get a full-featured hosting solution. Our platform allows you to:

  • Easily register and manage domains in one place
  • Update DNS settings and name servers without technical hassle
  • Host websites on secure, high-performance servers
  • Enjoy 24/7 support from a team that knows web hosting

Whether you are launching your first website or managing multiple domains, WebHost4Life provides the tools and support to make domain management simple and reliable.

How to Edit MX Records for Your Domain at WebHost4Life

Each domain hosted in your WebHost4Life account comes with two default MX records, which point to our mail servers. MX records (Mail Exchange records) determine where your domain’s email is delivered, so it’s important to set them correctly for your email to function properly.

If you have your own mail server or want to use a third-party email service, you will need to update your domain’s MX records to point to the external server’s MX records. This ensures that emails sent to your domain are correctly delivered to the mail service you use.

Steps to Edit MX Records in WebHost4Life:

  1. Log in to your WebHost4Life account.
  2. Go to My Domains > DNS Records.
  3. Find the domain you want to update and click on it to expand its details.
  4. Replace the current mx1 and mx2 records with the new MX records provided by your email service.
    • The highest priority is 1 and the lowest priority is 100.
  5. When ready, click the Modify button to save your changes.

Tips:

  • Always verify the MX records provided by your email provider. Incorrect MX records can cause email delivery issues.
  • If you’re switching from WebHost4Life’s mail servers to a third-party service, you may want to keep a backup of the original MX records.
  • Changes to MX records may take up to 24 hours to propagate across the internet.

By following these steps, you can manage your domain’s email routing efficiently while using WebHost4Life’s reliable hosting platform.

How to Change the WHOIS Details of a Domain Name at WebHost4Life

Most domain name types (TLDs) that we register offer the option to change these contact details.

You can do that from the Registered Domains section (My Domains > Registered Domains) of your Control Panel.

OPTION 1: 

In the table of registered domains, search for the ‘eye’ icon ( ) in the Edit DNS/Whois column pertaining to the domain the Whois data of which you want to edit.

Click on the icon and you will be forwarded to a form where you can input new contact information for each section – registrant, billing, administrative and technical.

Once you fill out the registrant section, and if you want to use the same contact information for all the other sections, there is an option to copy the same information in the other sections as well.

As soon as you are ready with all the changes in all the sections of the WHOIS record, simply press the Save Information button at the bottom of the page and that will update the WHOIS record for you.

You should see a message The details have been modified successfully! to confirm that.

Please have in mind that WHOIS changes may require up to 24 hours to update worldwide.

OPTION 2: 

Tick the checkbox next to the domain that you want to edit, then click on the “Change WHOIS” button that is located just above the domains.

Then follow the edit-Whois steps as described in Option 1 above:


Edit WHOIS

Through this option, you can also edit the Whois data of multiple domains at a time.

NOTE: Keep in mind that the contact details of some TLDs (.co.uk, .org.uk, .me.uk, .ca, .eu, .be, .at). cannot be changed.

Others require a manual change, so if you encounter any error message, you can contact us by opening a ticket from Help Center -> Open Support Ticket in the top-right corner of your Control Panel or the button below.

Please be informed that the WHOIS record is public and anyone on the web can look up the WHOIS record of any domain name that is currently registered. This exposes your personal contact details, incl. name, address, etc. to the public. If you want to purchase the WHOIS ID protection service that helps hide your personal data and protect it from malicious use such as spam emails and telemarketing, please refer to the What is Domain Name WHOIS Privacy Protection article.

Have in mind that providing false contact information in the WHOIS record is considered illegal and may result in cancellation of the domain registration. Therefore that is not an alternative to the WHOIS ID protection service.

What Is Domain Name WHOIS Privacy Protection?

The WHOIS privacy protection is an add-on service available for some domain TLDs (.com, .net, .biz, .org, .info, .we.bs, .me, .tv, .cc, .asia). Others such as .US, .UK, .COM.AU, do not support this feature on the top-level.

When you register a domain name you provide your personal and/or business contact information, incl. name, address, phone number etc.

Each domain that is successfully registered has the so-called WHOIS record. The WHOIS record is comprised of information about the domain name itself – when it was registered, when it expires, what the current name servers are and so on, and it also displays the registrant, administrative, technical and billing contact information that has been provided for the domain name.

This WHOIS record is public and anyone on the web can check the WHOIS data of any domain name that is currently registered. Because the WHOIS service is available to the public, it exposes your contact details to everyone.

The WHOIS privacy protection service helps conceal your personal data and protect it from malicious use such as spam emails and telemarketing.

When you purchase the WHOIS privacy protection service for a particular domain name, the WHOIS record of your domain name will display our company contact information instead of your personal information.

Although your data in the public WHOIS record is replaced by ours, you still remain the rightful owner of your domain – the WHOIS privacy protection service does not in any way affect the actual ownership of the domain.

You can order WHOIS privacy protection, for any domain name from the list of the supported TLDs that you have registered with us using the Domain Manager section (My Domains > Registered Domains tab) of your Control Panel.

In the table of domains, just click on the icon in the Whois Privacy Protection column pertaining to the domain you want to enable Whois provacy for as shown on the image below:

WHOIS ID protection

Once you click on that icon a small pop-up window will come up with information about the Whois Privacy Protection service, the price to enable that service, as well as the available payment options.

Once you select the payment method you want to use to submit the payment, you must click on the Continue button below and that will take you to the payment page where you have to fill out your payment information.

Have in mind that providing false contact information in the WHOIS record is considered illegal and may result in cancellation of the domain registration. Therefore that is not considered an alternative to the WHOIS ID protection service.